


Ghoulia repaint Step by Step, a set on Flickr.
I posted my step by step pictures and descriptions to flickr. More tomorrow.
Thursday, June 14, 2012
Tuesday, June 12, 2012
Repainting Ghoulia
Yesterday I started repainted my ghoulia doll. I want to make her soft looking and keep her original eye color.
This is a plan I drew up for her.
I drew my idea, then took a picture and colored it on my ipad using procreate. I also took a picture of the fabric I had, and overlayed it on the dress design.
So far I have wiped off her factory paint using acetone, sealed her with ZM spray and drawn her basic eyes and eyebrows using Derwent watercolour pencils.

I plan on finishing her tomorrow and posting step by step pictures of how I repainted her.
Thank you for looking!
This is a plan I drew up for her.
.PNG) |
| What I want her make up and dress to look like |
 |
| What she looked like originally |
I plan on finishing her tomorrow and posting step by step pictures of how I repainted her.
Thank you for looking!
Sunday, June 10, 2012
Taking a break
Not from posting on my blog, but from working on my poseable doll mocha. I haven't really felt like working on her, and when I force myself to, it becomes stressful and things don't turn out as well.
Such as her hands. I think I'm going to have to break them off and redo them. That's not going to be fun.

They actually look a bit better in real life, but still, I think I am going to redo them. I mixed some sculpey mold maker in the clay to make it more flexible and durable, but it seems it reacted badly with the heat gun, turning yellow and bubbling. I am also not sure if they really are more flexible now because a crack developed at the base of one of the middle fingers.
On the other hand, I started on her make up and I Iike the way it is turning out.
I still have to add her eyebrows. I think I am going to make them a medium brown so she can wear many different colors of wigs.
I am going work on doll repaints for now, and that is what I will be posting about instead the above.
Thanks for visiting.
Such as her hands. I think I'm going to have to break them off and redo them. That's not going to be fun.
They actually look a bit better in real life, but still, I think I am going to redo them. I mixed some sculpey mold maker in the clay to make it more flexible and durable, but it seems it reacted badly with the heat gun, turning yellow and bubbling. I am also not sure if they really are more flexible now because a crack developed at the base of one of the middle fingers.
On the other hand, I started on her make up and I Iike the way it is turning out.
I still have to add her eyebrows. I think I am going to make them a medium brown so she can wear many different colors of wigs.
I am going work on doll repaints for now, and that is what I will be posting about instead the above.
Thanks for visiting.
Friday, June 8, 2012
Toes, toes, toes, toes....
...are what I sculpted today.
This was my second try. The first totally failed. I find toes and feet even harder to get right than hands. It seems so difficult not to make them look short and stubby but not creepily long.
And here are the legs those feet are attached to.

I like the way the legs turned out. I still need to sand the feet, they look a little gnarled right now. I'm planning on making the arms and hands tomorrow or the day after. Then I can get to painting, padding, wigging and clothing!
I also made more eyes today, but they don't photograph well without sunlight and my cameras batteries keep on dying. I love making eyes, shame they never look as good in pictures as they do in real life.
Thank you for reading!
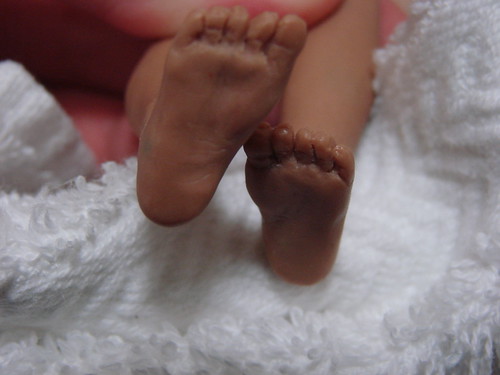 | ||
| Cute but so annoying to make |
This was my second try. The first totally failed. I find toes and feet even harder to get right than hands. It seems so difficult not to make them look short and stubby but not creepily long.
And here are the legs those feet are attached to.
I like the way the legs turned out. I still need to sand the feet, they look a little gnarled right now. I'm planning on making the arms and hands tomorrow or the day after. Then I can get to painting, padding, wigging and clothing!
I also made more eyes today, but they don't photograph well without sunlight and my cameras batteries keep on dying. I love making eyes, shame they never look as good in pictures as they do in real life.
Thank you for reading!
Thursday, June 7, 2012
My first Sculpting from Life and a Quick Eye Tip
Yes, I skipped yesterday as I was exhausted. I had six hours of school and then three hours of life drawing/sculpting, it was nine when I got home.
By the way, it was my first time going to a live nude study, and I'm rather pleased with how my sculpture turned out.
Not perfect, but good. At least I think so. It was definitly a new experiance, having a live nude model. She was a cute asian girl with a buzzcut. I'm just glad it wasn't a fat old man, nothing against fat old men, it would just be even more uncomfortable seeing them naked. At first I was quite embarrassed and it was hard to look directly at her. I soon got use to it though, and it was very helpful having real 3d reference. The sculpture is unfinished and the model won't be doing this pose again so I'm not sure what I'm going to do. I still see many things that need fixing, but can't quite get them right. So any constructive criticism you have would be welcome. I am also unsure of what to do with the sculpture when it is done. I don't want to keep it, and I don't want to squish it. My stepmother suggested I sell it, but as my father says, it isn't the most attractive pose. Any suggestions?
Anyway it was fun, and I think I'm going to go back. I might even take a class there on figure sculpting, though the flier mentions group discussions. And I don't like group discussions, the make me nervous and it's hard for me to speak up. I think it would be worth it even enduring the discussions, to learn from a professional.
And here is a picture of some of the eyes I was talking about last post.
I was right, the problem was the type of paint. If I use artist acrylic instead of craft acrylic I can get perfect circles using the dotter/embossing tool or a toothpick. It's still hard to get the pupil centered, but at least now I only have one problem to deal with instead of three.
Also, here is a tip for getting rid of airbubbles in your resin. First try your heatgun on them, most of the time the air in the bubble heats up and rises to the top. If that doesn't work, poke at the bubble with a needle, nudging it to the top. The needle won't pop it, but now if you heat it up again it should work. I think sometimes the bubble gets stuck/attached to the eye and nudging it frees it allows the air to rise when heated.
One more thing, when using uv resin I find even when the resin is fully cured the surface layer stays sticky and if you touch it, it loses its wonderful shine. Instead of always having to re-gloss the eye, which doesn't even make it as shiny as before, simply use your heatgun or the oven to make them hot - before - you touch them and they won't be sticky and will keep their extreme glossiness.
I received the liv doll that I ordered from amazon. I glad I found her on sale for 6 dollars. I'm going to try to modify her lips, her top lip is just so derpy looking. The space between her nose and top lip is just too large and I hate it. After fixing that I will repaint her. I'm going to be posting more about repainting soon, when I go back to my moms where all my paints and pastels are located. I think I'm going to be posting several repainting tutorials soon. There seems to be barely any at all, especially for monster high dolls. But yeah, expect to see alot more fashion doll repaints, I've amassed a lot of dolls to paint. Three monster highs, one moxie teenz, around 8-10 various barbies and now this liv. I think I must be crazy.
I will still post ooak sculptures, I promise!
Thank you for reading!
By the way, it was my first time going to a live nude study, and I'm rather pleased with how my sculpture turned out.
 |
| More picture on my flickr |
Not perfect, but good. At least I think so. It was definitly a new experiance, having a live nude model. She was a cute asian girl with a buzzcut. I'm just glad it wasn't a fat old man, nothing against fat old men, it would just be even more uncomfortable seeing them naked. At first I was quite embarrassed and it was hard to look directly at her. I soon got use to it though, and it was very helpful having real 3d reference. The sculpture is unfinished and the model won't be doing this pose again so I'm not sure what I'm going to do. I still see many things that need fixing, but can't quite get them right. So any constructive criticism you have would be welcome. I am also unsure of what to do with the sculpture when it is done. I don't want to keep it, and I don't want to squish it. My stepmother suggested I sell it, but as my father says, it isn't the most attractive pose. Any suggestions?
Anyway it was fun, and I think I'm going to go back. I might even take a class there on figure sculpting, though the flier mentions group discussions. And I don't like group discussions, the make me nervous and it's hard for me to speak up. I think it would be worth it even enduring the discussions, to learn from a professional.
And here is a picture of some of the eyes I was talking about last post.
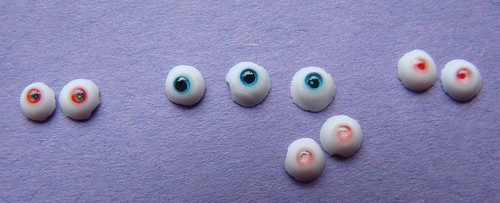 |
| Click to enlarge |
I was right, the problem was the type of paint. If I use artist acrylic instead of craft acrylic I can get perfect circles using the dotter/embossing tool or a toothpick. It's still hard to get the pupil centered, but at least now I only have one problem to deal with instead of three.
Also, here is a tip for getting rid of airbubbles in your resin. First try your heatgun on them, most of the time the air in the bubble heats up and rises to the top. If that doesn't work, poke at the bubble with a needle, nudging it to the top. The needle won't pop it, but now if you heat it up again it should work. I think sometimes the bubble gets stuck/attached to the eye and nudging it frees it allows the air to rise when heated.
One more thing, when using uv resin I find even when the resin is fully cured the surface layer stays sticky and if you touch it, it loses its wonderful shine. Instead of always having to re-gloss the eye, which doesn't even make it as shiny as before, simply use your heatgun or the oven to make them hot - before - you touch them and they won't be sticky and will keep their extreme glossiness.
I received the liv doll that I ordered from amazon. I glad I found her on sale for 6 dollars. I'm going to try to modify her lips, her top lip is just so derpy looking. The space between her nose and top lip is just too large and I hate it. After fixing that I will repaint her. I'm going to be posting more about repainting soon, when I go back to my moms where all my paints and pastels are located. I think I'm going to be posting several repainting tutorials soon. There seems to be barely any at all, especially for monster high dolls. But yeah, expect to see alot more fashion doll repaints, I've amassed a lot of dolls to paint. Three monster highs, one moxie teenz, around 8-10 various barbies and now this liv. I think I must be crazy.
I will still post ooak sculptures, I promise!
Thank you for reading!
Tuesday, June 5, 2012
A Boring Day with Grass and Eyes...
To be honest, I really didn't do much today.
My father and I put together a static grass applicator using an electronic fly swatter and a metal mesh shaker. In case you don't know static grass is green short rayon fibers that hold a static charge that helps them stand upright instead of matted down. It is pretty realistic looking miniature grass and is commonly used in model train sets. It's just like when you rub a balloon on your arm or hand and your hair is pulled towards the balloon. The static grass applicator just makes a stronger field, therefore straighter grass. I'm going to use the grass on my bases and I'm also going to try to make a wig with viscose fibers for a shaved/short hair look.
I also played around with the perfect eye tools from Pat Moulton that arrived today. Oh my god, they make producing the eye bases a cinch! I first discovered these tools from this wonderful tutorial on making glass like doll eyes. Seriously go check it out, it's great! I am really glad I bought the tools, I'd say they're well worth the money. Despite the clay part of the eyes being so easy, I've been struggling with the rest. The iris isn't too hard, but the pupil! Argh! I can never get a perfect set, they are either misaligned or not even a circle.
I have no idea how Aimee manages to get pupils like she does, I've tried the dotter tool, and while it works on fashion doll repaints, the paint doesn't seem to stick to my clay eyes. I think I might be using the wrong paint, but alas, my quality acrylic is at my moms house.
I will post some pictures of my attempts tomorrow, but right now it is far too late.
Good night. Thank you for reading!
Monday, June 4, 2012
My Tools and a Torso
Hi again, I'm here to keep my promise.
I don't have as much to say as I did yesterday.
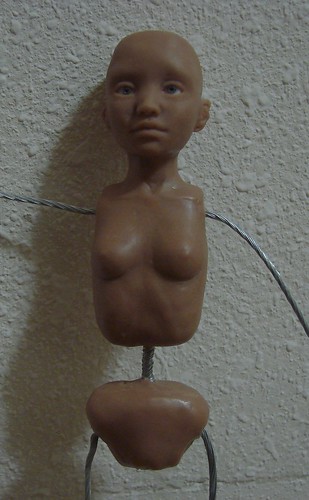
So far today, I've basically finished mocha's torso sculpting. I still have a bit to refine, but I need to finish her arms and legs first. Above you can better see how she will be able to pose. The bare wire will have cotton batting glued on it, and then a pattern of stretchy knit fabric as skin will be glued across the gap onto the clay and filled with polyfil. Therefore she will be the right shape under clothes, but soft enough for the wire to bend. That's all after she has been completely baked though, to eliminate any risk of fire/burnage.
You probably can't see it in the above picture but she has developed a crack in the corner of her eye, so here is a close up shot...
I think it is from the Prosculpt in her clay mix, as I've only ever gotten cracks from simply baking using that. It's small and should be easy to fix, I only hope no more happen.
Today I also wanted to show the tools I have used for mocha so far.
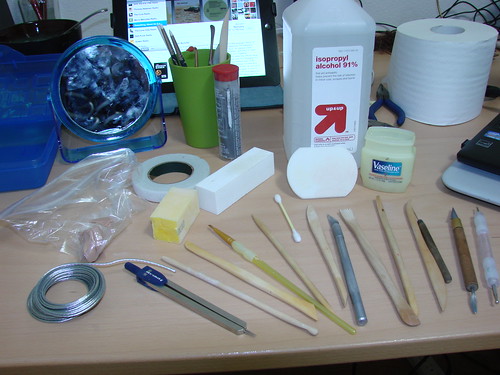
From upper left to lower right:
I have even more tools that I use crammed all about my two rooms (my parents are divorced), but that would take hours to catalog them. : D
Wooo, I'll post again tomorrow. That's all, thanks for reading.
And as always please feel free to ask me any questions!
I don't have as much to say as I did yesterday.
So far today, I've basically finished mocha's torso sculpting. I still have a bit to refine, but I need to finish her arms and legs first. Above you can better see how she will be able to pose. The bare wire will have cotton batting glued on it, and then a pattern of stretchy knit fabric as skin will be glued across the gap onto the clay and filled with polyfil. Therefore she will be the right shape under clothes, but soft enough for the wire to bend. That's all after she has been completely baked though, to eliminate any risk of fire/burnage.
You probably can't see it in the above picture but she has developed a crack in the corner of her eye, so here is a close up shot...
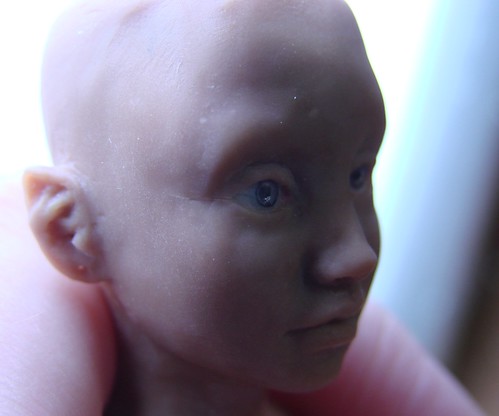 | |||
| Click to enlarge |
Today I also wanted to show the tools I have used for mocha so far.
From upper left to lower right:
- a mirror to check for symmetry
- a cup for holding tools less often used
- plumbers epoxy for armature strength
- rubbing alcohol that I use with q tips and a brush to smooth and clean the clay
- pliers to bend wire
- toilet paper to clean up spills and my ever running nose (damn allergies!)
- clay in a baggie to protect from dust
- floral tape that I wrap around wire or epoxy to help the clay stick
- my two sanding sponges and rough sanding sponge
- vaseline to smooth clay and get rid of white marks from sanding
- picture hanging wire made up of about 15-20 thin wire coiled together (I usually use plain steel wire of various gauges, but since she is poseable, I think coiled wire will be more durable)
- calipers to check more symmetry
- wooden tools of various sizes (including another tool useful for smoothing large areas, a wood tool with a square end that has notches cut out of it, I think its called a rake)
- a needle tool
- metal embossing tool...
I have even more tools that I use crammed all about my two rooms (my parents are divorced), but that would take hours to catalog them. : D
Wooo, I'll post again tomorrow. That's all, thanks for reading.
And as always please feel free to ask me any questions!
Sunday, June 3, 2012
A Tip for Blending and Smoothing Polymer Clay
I apologize for taking so long to post again. I was held back by a combination of procrastination and fear. After having a discussion with my family about what I want for my future, I have decided to try even harder with my art and my blog. Therefore I have issued a challenge to myself to post everyday for 60 days.
I wanted to show you some of my art!
Currently, I am working on a poseable fairy doll. She will be around 8 inches and I'm planning on making her several interchangeable wigs, outfits, and shoes.
I wanted to show you some of my art!
Currently, I am working on a poseable fairy doll. She will be around 8 inches and I'm planning on making her several interchangeable wigs, outfits, and shoes.
 |
| Unamed as of yet. Any ideas? |
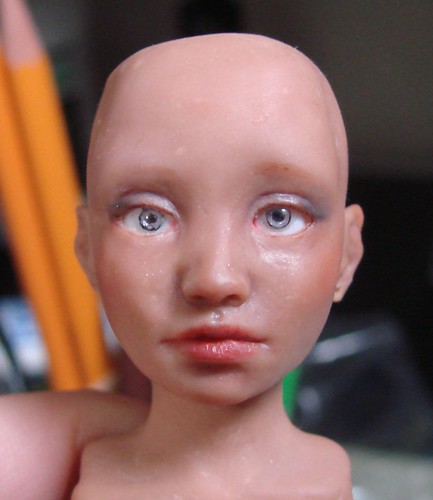
This her head so far. She is made with a mixture of Prosculpt, Puppen Fimo and Fimo Soft. Her eyes are handmade by me using white and translucent polymer clay, paint and UV resin gel. It is the first time I have experimented with skin tones other then the premade clay packages. Getting a mini food processor really makes the whole process a snap. I'd suggest this one, it was the cheapest one with the best reviews so I got it and it has worked really well and fast!
So far I've succeeded in getting a color that I like. But my second goal, making the clay easy to blend like pure Prosculpt but avoiding the many moonies I always get with it by adding Fimo Soft and Fimo Puppen, didn't quite work out. I don't know about the moonies yet, I've only used the heatgun not the oven (cross your fingers for me!). The blendinging though, was not easy as I had hoped. It was certainly better than pure Puppen Fimo, but still not good enough.
Luckily, through my customary manic research (I love finding useful information) I found what I think is a better and easier way to smooth than simply using rubbing alcohol. It seems so simple and obvious now, I can't believe I never tried it before.
 |
| An example of bad blending, this doll was done with pure Puppen Fimo and was impossible to get smooth! |
Puppen Fimo is my perfect clay, aside from the fact that I never could seem to fully blend all the layers of clay together. I'd add a bit of clay to the cheek and try my hardest to blend it with my finger, tools, rubbing alcohol and even acetone, but you always see a little ridge, line, gap at where the two layers of unbaked clay joined. If I pressed hard I could perhaps get it to blend, but then that made an unwanted impression. You may not have had the trouble with blending I've had, but I'd still say that this method below seems to really make the surface of the clay velvety smooth and perfectly seamless with minimal time and effort!
First, while you are still working on the form, keep on using that rubbing alcohol to neaten things out. It's not perfect but it helps. Once you have finally decided that all your planes and depth is down and you're done with the sculpting, you can use vaseline or (so I've heard) mineral/baby oil or perhaps even sculpey dilutent, on your finger or wooden tools (wood helps absorb and hold vaseline unlike metal/plastic) to blend your surface! Vaseline seems to permanently soften the clay, not just melt the top layer temporarily like the alcohol. While softening, it also seems to weaken, which is why it's important to only use it on your very outer clay layer and not the more structurally vital inners. It's not finished though. The surface may be seamless now but not velvety smooth yet. So go ahead and soft fire it with your heat gun (it's easier to sand soft), and then buff with a fine grit sanding sponge until you are satisfied.
I've heard people always say they get their sanding sponge at a home improvement store, but I've never found a fine enough grit one there. I use nail buffing sponges which you can find at you local grocery or drug store for about a dollar. That's all for now, I really should get to bed. I am as shy as I say, but once I get going I guess I turn into a chatterbox!
I'll see you tomorrow, and please feel free to ask me any questions.
Also check out my Flickr for more pictures.
Thank you for reading.
Subscribe to:
Posts (Atom)